The Skyline to the Sea Trail is one of the most iconic backpacking routes in California’s Bay Area. This classic multi-day hike takes you from the ridgeline at Castle Rock State Park all the way to the Pacific Ocean at Waddell Beach, passing through the beautiful redwood forests of Big Basin Redwoods State Park along the way.
Despite its name, the trail isn’t all downhill! The route includes quite a bit of elevation gain and loss as it winds through ridges, valleys, and forested canyons. Park rangers often rate it as moderate to strenuous, so proper preparation and planning are important.
I completed this hike in August 2018 with a group of five friends and a dog. At the time, I was living in California and frequently visited Big Basin Redwoods State Park because it was one of my favorite places to escape the city and spend time in nature. The towering redwoods, quiet forest trails, and cool coastal air make this area incredibly special, and the Skyline to the Sea Trail is a fantastic way to experience it over several days.
This post outlines a 3-day backpacking itinerary, along with tips and things I learned from the trip.

Trail Overview
- Start: Castle Rock State Park
- End: Waddell Beach (Pacific Ocean)
- Total distance: 28-30 miles (about 48km depending on route variations)
- Duration: 3 days / 2 nights
- Difficulty: Moderate to Strenuous
- Backcountry Trail Permit Required: Yes (backcountry trail permits are required).
- Camping Options: Waterman Gap, Sunset Camp, and Jay Camp. Camping costs about $15 night per site, with a six people per site. Each reservation typically includes parking for one vehicle.
Transportation Logistics
Because this hike is point-to-point, transportation logistics need to be planned in advance.
Most hikers leave one vehicle near Waddell Beach (across from the yellow gate near the trail exit) and then drive a second car to the starting point at Castle Rock State Park. The drive between trailheads takes about one hour.
There is very limited or no cell service along most of the route, so coordinate plans with your group before starting the hike.
Some hikers choose to hitchhike back to their starting point after finishing the trail — personally, I wouldn’t rely on that option!
Day 1: Castle Rock Parking Lot –> Waterman Gap Campgrond
- Distance: 9.3miles (15km)
- Overnight: Waterman Gap Campground
- Water Available: Yes
- Tip: This is the last reliable water source before Sunset Camp – refill all containers here.
The hike begins at the Castle Rock State Park parking area, where you quickly enter a mix of shaded forest trails and exposed rocky ridgelines.
The first day involves steady climbing and descending as the trail winds through oak woodland and sandstone formations. There are several scenic viewpoints where you can see across the Santa Cruz Mountains, making it a great place to take short breaks and enjoy the landscape.
One memorable moment from our trip happened on a narrow section of trail along a cliffside. Suddenly we heard the unmistakable rattle of a rattlesnake just ahead of us.
The snake was positioned right along the path and became more defensive every time we tried to move forward. The trail was extremely narrow with a steep drop-off beside it, so passing wasn’t easy. After waiting for a while and giving it plenty of space, we carefully crossed without disturbing it. Thankfully, no one (including the dog!) got bitten.
Encounters like this are a good reminder that you’re sharing the trail with wildlife, and it’s always best to stay calm and give animals plenty of room.
By late afternoon we reached Waterman Gap Campground, a quiet backcountry site surrounded by trees.

Important Tip
Waterman Gap is the last reliable potable water source before Sunset Camp, so make sure to refill all of your bottles and hydration reservoirs here.
Even if your pack feels heavy, you’ll thank yourself the next day.
Day 2: Waterman Gap –> Sunset Camp
- Distance: ~9miles (14km)
- Overnight: Sunset Camp
- Alternative Camp: Jay Camp
Many hikers consider this the most challenging day of the trip. The trail includes multiple uphill sections and long stretches through dense forest.
After leaving Waterman Gap, the route gradually leads into the heart of Big Basin Redwoods State Park, where the scenery changes dramatically. The forest becomes cooler and darker as you enter groves of towering redwood trees that are hundreds — sometimes over a thousand — years old.
One of the highlights of the day is reaching Big Basin Headquarters. At the time of our hike, this area had restrooms, small store, food and drinks available for purchase, picnic areas for resting.
It’s a great place to take a longer break and recharge before continuing deeper into the park.The trail continues toward Sunset Camp, climbing through forest and following sections of creek.
Although there is no potable water at Sunset Camp, the nearby creek can be used as a water source if you bring a water filter or purification system. Because of this, carrying a lightweight water filter is highly recommended for this hike.
Sunset Camp itself is a peaceful backcountry campground tucked among the trees. After a long day of hiking, cooking dinner with friends and relaxing around camp felt incredibly rewarding.

Day 3: Sunset Camp –> Waddell Beach
- Distance: 7.2 miles (11.5km)
The final day is generally the easiest and most relaxing portion of the hike.
The trail gradually descends through shady redwood forest, making the morning hiking conditions cool and comfortable.
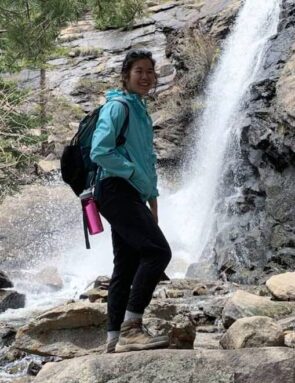
Along the way, you’ll pass two beautiful waterfalls that are popular stops for day hikers. These spots are perfect for a short snack break or photos, though they can be a bit busy compared to the quiet backcountry sections of the trail.
As you continue toward the coast, the landscape slowly begins to change. The dense forest opens up and the air becomes cooler and saltier as you approach the Pacific Ocean.
Eventually, the trail emerges at Waddell Beach, where the sound of waves replaces the quiet forest atmosphere.
After several days hiking through mountains and redwood groves, finishing the trail right at the ocean feels incredibly satisfying.For me, the trip ended with tired legs, great memories, and a cozy morning moment where I got to snuggle with Otis (my friend’s dog) inside my tent before packing up for the final hike out.

What to Pack for the Skyline to the Sea Trail
If you’re planning this backpacking trip, here are a few essentials I recommend bringing:
- Backpacking tent
- Lightweight sleeping bag
- Water filter or purification tablets
- Headlamp or flashlight
- Trekking poles (helpful for the climbs and descents)
- Snacks and easy backpacking meals
- Extra layers (coastal weather can change quickly)
- Map or offline navigation app
Because cell service is unreliable along the trail, it’s also a good idea to download maps in advance.
Best Time to Hike Skyline to the Sea
The trail can be hiked year-round, but the best seasons are typically spring and fall when temperatures are cooler and waterfalls are flowing well.
Summer can still be a great time to hike thanks to the shade provided by the redwoods, but be prepared for warmer temperatures on exposed ridgelines.
Winter hikes can be beautiful but muddy, especially after rain.
Final Thoughts
- The Skyline to the Sea Trail is a fantastic introduction to multi-day backpacking in Northern California. It offers a little bit of everything:
- Mountain ridgelines
- Ancient redwood forests
- Waterfalls
- Creek crossings
- A rewarding finish at the Pacific Ocean
- Hiking this trail with friends made the experience even more special, and it remains one of my favorite backpacking trips from the years I lived in California.
- If you enjoy multi-day hikes and want a route that combines incredible scenery with a manageable 3-day itinerary, Skyline to the Sea is definitely worth adding to your list.
Final Tips Before You Go
- Expect limited or no cell reception throughout most of the trail
- Check park conditions and closures before your trip
- Reserve campsites and permits in advance
- Bring a water filter for creek water near Sunset Camp
- Plan transportation between trailheads ahead of time